Seven obstacles of SQL Server Core Installation
SQL Server Windows Core installation does not support Reporting Service
Read next: Five Steps of Remote SQL Server installation using PowerShell
In previous topics I've described what kind of problems you can face during SQL Server core installations and I think to make the picture fully clear I have to cover the preparation steps of installing and configuring Windows Core for SQL Server installation.
As usually I do everything step by step:
Step #1. Setting up Virtual machine in Hyper-V
You can do your exercise in VMWare as well. In My case I have native Hyper-V App on my Windows 8 Pro laptop.After you install your Hyper-V application and run it you create new virtual machine:
In the "Actions" panel click "New" and choose "Virtual Machine"
On the next screen click "Next"
Then mark a checkbox "Store the virtual machine in different location" and specify the location where you want to keep your new VM. You might skip that step, but I prefer to keep everything under mine control and in case I need to do a cleanup I know which folder to delete to get some extra space.
After making the change click "Next"
On that screen change radio button to "Generation 2" and click "Next."
Select network you use. That is the trickiest part. I will not explain how to set the network. Just Google it: https://www.google.com/webhp?sourceid=chrome-instant&ion=1&espv=2&ie=UTF-8#q=how+to+configure+external+network+in+Hyper-V
You need the network for your new windows installation to access Internet to download necessary updates.
After specifying the network click "Next".
It will be completely enough for our exercise. Click "Next" after the change.
You are supposed to have pre-downloaded Windows Server Installation ISO image.
You can download Evaluation Windows Server from here: https://www.microsoft.com/en-us/evalcenter/evaluate-windows-server-technical-preview
For this example I've chosen Windows Server 2016 Technical Preview 5.
Note: Do not try to use 64-bit installation on 32-bit workstation. It won't work.
After you specify the file click "Next".
In very few moments your virtual machine will be created.
The very first thing you have to do after that is to create a checkpoint:
Do Right Click on your new VM and choose "Checkpoint"
As a result it will create a new record in "Checkpoint" panel:
I renamed that record to "VM Original setup" :
You might need that checkpoint of your VM in case you decide to reinstall Windows. In that case you wouldn't have to recreate the machine. That is just a saving point for the first step.
Step #2. Windows Core Installation.
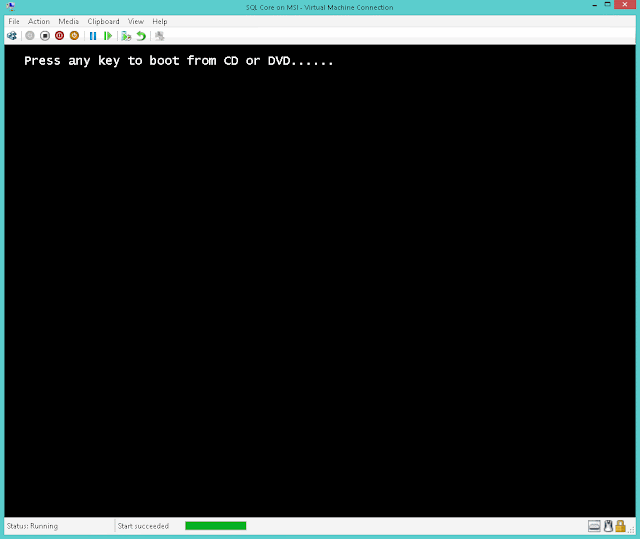
At first, do right click on your virtual machine click "Start" and then click "Connect"In case you set your VM correctly you'll get the following screen:
You have to hit any button within 5 seconds, otherwise VM will try to run not from your image, but from the network. In case you were late, just shot it down and restart.
If your windows image is accepted you have to get following screen:
Here just click "Next"
Click "Install now"
Click blue sign "I do not have a product key", that will activate 180 days evaluation.
On that screen choose the very first item. It does not say "Core", which is pretty confusing. However, having words "Desktop Experience" for another installation leads me to an idea that "Core" is a new default standard of Windows.
Read the document, mark checkbox and hit "Next".
Obviously, on that screen you choose the second option.
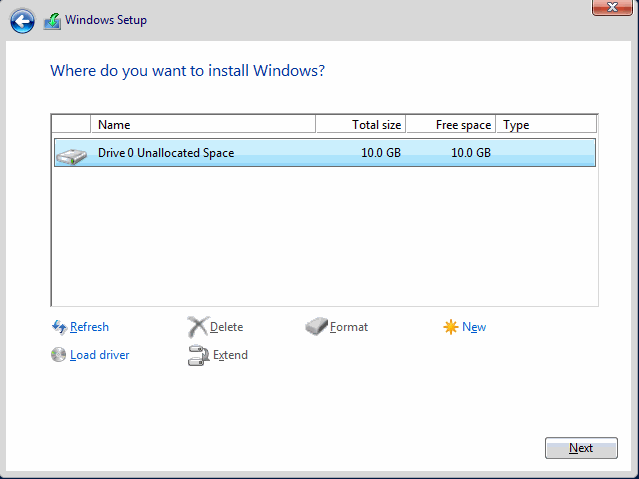
We do not have to do anything with our 10Gb drive. Just hit "Next"
Installation has started
After a while you get following screen:
To satisfy the requirement, you have to virtually press "Ctrl-Alt-Del" using Hyper-V or VMWare interface or just press "Ctrl-Alt-End" on your keyboard.
Say OK and hit Enter.
Enter new password. For that demo I'm using password: "LocalAdmin2016"
Say OK.
And you are done with Windows Core Install!!!
The last thing you have to do: create another checkpoint for your VM
And then Rename it to "After Windows Installation"
Actually, by doing that I was little bit surprised. There is ABSOLUTELY NO Interface! NONE! Zero!
Step #3. Establishing Network connection.
If you setup your network adapter and virtual switch correctly that step has to be short and easy for you.Just run following command to create network resource:
>NET USE L: \\<DServer Name>\<Shared Resource Name> /USER:<User name> /persistent:yes
Than provide password and verify the mapped drive by following command:
>NET USE
You should have result about like that:
There are two reasons why do we do that:
1. It is our checkup of the network.
2. We might need to transfer some files, scripts, logs inside and out of that VM box.
At the end, create another checkpoint called "Network Set"
Step #4. Set your new server for remote management.
Here you have two options:First (conventional): Run Windows configuration CMD file:
> SCONFIG.CMD
See a description how to set Windows Core Server in 12 steps: http://pc-addicts.com/12-steps-to-remotely-manage-hyper-v-server-2012-core
Second (guru way): Use PowerShell.
Because the first way is already discovered, we go the second way.
1. In your shared folder Create a file "WinCoreConfig.PS1", copy-pase following PowerShell script into that file and save it. In my case path to this file is: "L:\Temp\WinCore\Scripts\Config_Batch.PS1"
#-------------------------------------------
#
# That is the simpliest PowerShell/NTShell script to Configure Windows Core Server for SQL Server Installation
#
#-------------------------------------------
# Setup TimeZone
control timedate.cpl
#-------------------------------------------
#3) Add Local Administrator
net user /add CoreAdmin LocalAdmin2016
net localgroup administrators CoreAdmin /add
#-------------------------------------------
# 4) Configure Remote Management
Enable-NetFirewallRule -DisplayGroup “Windows Remote Management”
#-------------------------------------------
#4A) Allow Pinging
Import-Module NetSecurity
New-NetFirewallRule -Name Allow_Ping -DisplayName “Allow Ping” -Description “Packet Internet Groper ICMPv4” -Protocol ICMPv4 -IcmpType 8 -Enabled True -Profile Any -Action Allow
#-------------------------------------------
#7) Remote Desktop:
# http://networkerslog.blogspot.com/2013/09/how-to-enable-remote-desktop-remotely.html
#A) Enable Remote Desktop
set-ItemProperty -Path "HKLM:\System\CurrentControlSet\Control\Terminal Server" -name "fDenyTSConnections" -Value 0
#B) Allow incoming RDP on firewall
Enable-NetFirewallRule -DisplayGroup "Remote Desktop"
#C)
set-ItemProperty -Path "HKLM:\System\CurrentControlSet\Control\Terminal Server\WinStations\RDP-Tcp" -name "UserAuthentication" -Value 1
#-------------------------------------------
#8) Network Settings
#N/A
#-------------------------------------------
#2) Computer Name:
Rename-Computer -NewName WinCore
#-------------------------------------------
# Open default SQL Server port
New-NetFirewallRule -DisplayName "Open Inbound Port 1433" -Direction Inbound –LocalPort 1433 -Protocol TCP -Action Allow
#-------------------------------------------
ECHO "Ready for Server Restart"
Pause
#13) Restart Server
shutdown /r /t 0
#
# That is the simpliest PowerShell/NTShell script to Configure Windows Core Server for SQL Server Installation
#
#-------------------------------------------
# Setup TimeZone
control timedate.cpl
#-------------------------------------------
#3) Add Local Administrator
net user /add CoreAdmin LocalAdmin2016
net localgroup administrators CoreAdmin /add
#-------------------------------------------
# 4) Configure Remote Management
Enable-NetFirewallRule -DisplayGroup “Windows Remote Management”
#-------------------------------------------
#4A) Allow Pinging
Import-Module NetSecurity
New-NetFirewallRule -Name Allow_Ping -DisplayName “Allow Ping” -Description “Packet Internet Groper ICMPv4” -Protocol ICMPv4 -IcmpType 8 -Enabled True -Profile Any -Action Allow
#-------------------------------------------
#7) Remote Desktop:
# http://networkerslog.blogspot.com/2013/09/how-to-enable-remote-desktop-remotely.html
#A) Enable Remote Desktop
set-ItemProperty -Path "HKLM:\System\CurrentControlSet\Control\Terminal Server" -name "fDenyTSConnections" -Value 0
#B) Allow incoming RDP on firewall
Enable-NetFirewallRule -DisplayGroup "Remote Desktop"
#C)
set-ItemProperty -Path "HKLM:\System\CurrentControlSet\Control\Terminal Server\WinStations\RDP-Tcp" -name "UserAuthentication" -Value 1
#-------------------------------------------
#8) Network Settings
#N/A
#-------------------------------------------
#2) Computer Name:
Rename-Computer -NewName WinCore
#-------------------------------------------
# Open default SQL Server port
New-NetFirewallRule -DisplayName "Open Inbound Port 1433" -Direction Inbound –LocalPort 1433 -Protocol TCP -Action Allow
#-------------------------------------------
ECHO "Ready for Server Restart"
Pause
#13) Restart Server
shutdown /r /t 0
2. Start PowerShell. In CMD window on your newly installed VMrun following command:
>start PowerShell.exe
You are supposed to get PowerShell blue screen:
3. Run the script from Network Shared folder. In my case command will be like this:
PS C:\> L:\Temp\WinCore\Scripts\Config_Batch.PS1
After command starts you might be disconnected.
Reconnect again and you are supposed to see following screen:
Change your time zone. Verify that script result has no errors and Hit "Enter" to restart the VM.
During the restart Windows will apply some changes and updates.
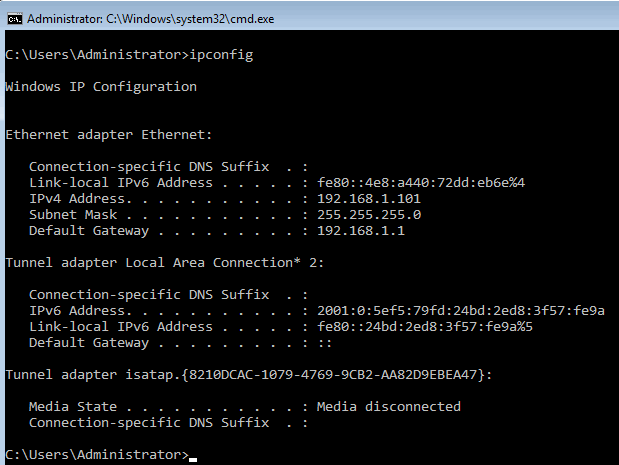
After machine will be up and running connect to it again and run "IPCONFIG" command:
>IPCONFIG
In my case it is: "192.168.1.101"
Now you can disconnect from the Virtual Machine and create another Checkpoint named "After Configuration".
Step #5. Establish Remote Desktop connection.
1. Start Remote Desktop on your local computer and connect to "192.168.1.101".2, Use Username "CoreAdmin" and Password "LocalAdmin2016" (See earlier created file Config_Batch.PS1 for details)
If you did everything right you have to get connected:
Step #6. Establish PowerShell connection.
1. On your local computer start PowerShell session.2. run following set of command in PowerShell (Credits to http://www.howtogeek.com/117192/how-to-run-powershell-commands-on-remote-computers/) ON ONE BY ONE BASIS:
> Enable-PSRemoting -SkipNetworkProfileCheck -Force
> Set-Item wsman:\localhost\client\trustedhosts *
> Restart-Service WinRM
> Test-WsMan 192.168.1.101
3. If test run successfully, you can try to connect to your VM via PowerShell:
> Enter-PSSession -ComputerName 192.168.1.101 -Credential CoreAdmin
After running that command you will be asked for a password:
Use "LocalAdmin2016" again and you will be connected in a moment:
The very last line indicates that you are successfully connected to your new VM Windows Core Server via PowerShell.
Step #7.Install SQL Server Engine.
At first, go to your VM settings and redirect its DVD Drive to SQL Server installation image file:Now you can create the lat Checkpoint called "Ready for SQL Server"


No comments:
Post a Comment