Tuesday, May 3, 2016

Five Steps of Remote SQL Server installation using PowerShell


Finally I've nailed down that topic and hopefully that will be my last post dedicated to SQL Server installations on Windows Core.

In this post I will show how it is easy to install SQL Server from a remote computer without remoting to a server, without any GUI, just by using simple command line.


Previous topics:
Seven obstacles of SQL Server Core Installation
SQL Server Windows Core installation does not support Reporting Service
How to Install and prepare Windows Core for SQL Server installation

Attention: Exercise in that blog-post REQUIRES Environment preparations described in my earlier post: How to Install and prepare Windows Core for SQL Server installation

Here is the step-by-step guidance:

Step #1. Start PowerShell in Administrator's mode.

Just do a Right Click on PowerShell Icon an choose "Run as Administrator" command:
You have to get something like this:

Step #2. Restart remote server.

We are under assumption that your server is in "Ready for SQL Server" stage, but just in case will restart it again.
At first we have to connect to the server:
> Enter-PSSession -ComputerName 192.168.1.101 -Credential CoreAdmin
(In your case Server IP/Name and Administrator's name could be different)

After providing Administrator's password you have to get in:

Now you can initiate Restarting command to the remote server:
> shutdown /r /t 0

Then immediately type and run:
> exit

And on your local machine start pinging the remote server:
> ping 192.168.1.101 -t

It will give you an idea what is going on with the reboot process and when server is back again.
In My case it looked like this:
- At first it took a while for the server to get down;
- Then it stopped responding on pinging;
- Then it disappeared from the network;
- Then it reappeared;
- And finally it became pingable again.

As soon server started responding you can press Ctrl-C to stop pinging.

Step #3. Installing the SQL Server.

Assumptions:
1. Your SQL Installation image is on "D:\" drive.
2. You have a local admin named "CoreAdmin" with password "LocalAdmin2016".

In that example, to save the time, I will run installation of ONLY of SQL Server Engine.

At first, clean the PowerShell window by following command:
> cls

Then connect to the remote server:
> Enter-PSSession -ComputerName 192.168.1.101 -Credential CoreAdmin

Enter the password and Now you are ready to run SQL Installation.

Just want to explain how that will be performed:
1. We create scheduled task to install SQL Server.
2. Schedule it one minute after "Now"
3. Waiting for the installation to be performed.

Little disclosure: Script is small and not perfect. If you run it at 23:59 it will fail. :-)


$action = New-ScheduledTaskAction -Execute 'd:\setup.exe' -Argument '/ACTION=Install /Q /IAcceptSQLServerLicenseTerms /INSTANCENAME=MSSQLSERVER /SAPWD=MyStrongSAPassword2016 /SECURITYMODE=SQL /FEATURES=SQLENGINE /SQLSVCACCOUNT="WinCore\CoreAdmin" /SQLSVCPASSWORD="LocalAdmin2016" /SQLSYSADMINACCOUNTS="WinCore\CoreAdmin" /AGTSVCACCOUNT="WinCore\CoreAdmin" /AGTSVCPASSWORD="LocalAdmin2016" /ASSYSADMINACCOUNTS="WinCore\CoreAdmin"'

$CurHour = Get-Date -Format HH; $CurMinute = Get-Date -Format mm
if ($CurMinute -eq 59) {$CurHour = [int] $CurHour + 1; $CurMinute = [int] 0} else {$CurMinute = [int] $CurMinute + 1}
 

$NewTime = Get-Date -Format HH:mm -Minute $CurMinute -Hour $CurHour
 

$trigger =  New-ScheduledTaskTrigger -Once -At $NewTime
 

Register-ScheduledTask -Action $action -Trigger $trigger -TaskName SQLInstall -Description "Install SQL" -User WINCORE\CoreAdmin -Password LocalAdmin2016

If you run following script right after, you will get some details on what you just did:


> Schtasks /Query /FO LIST /V /TN SQLInstall; Get-Date -Format HH:mm:ss
Here is what I've got:

As you can see, my current time was "21:42:17" and SQL Installation task was scheduled for the very next minute: "9:43:00 PM"

I run that script again to see the progress:

As you can see, task started at "9:43:01 PM" and current status has changed to running.

Actually, I was lucky enough to capture that, because a moment after that the situation has changed to the following:

Status has changed from "Running" to "Ready".

At this point we do not know if our installation finished successfully, but anyway, we can perform the cleanup and delete the task we used:
> schtasks /Delete /TN SQLInstall /F

Step #4. Verification.

At first, run following two commands:
$file = Get-Item "c:\Program Files\Microsoft SQL Server\130\Setup Bootstrap\Log\Summary.txt"

$file.LastWriteTime
Note: The number "130" is Compatibility Level assigned to SQL Server 2016.
Correspondingly other versions have following numbers:
2014 - 120
2012 - 110
2008 - 100


Here is my result:
Only at that point I've realized how lucky I was by capturing that task in still running state. Just one second before it finished.

So, from that point we can see that SQL Server Engine installation took on regular workstation 6 minutes and 4 seconds.

Now we have to verify how successful it was using following simple command:

> type "c:\Program Files\Microsoft SQL Server\130\Setup Bootstrap\Log\Summary.txt"

Here is the last portion of the "Summary.txt" file:
From that perspective everything is OK.

And here is the last checkup:
Will verify if SQL Server is actually working:
cd "c:\Program Files\Microsoft SQL Server\130\Tools\Binn".\OSQL -E -Q "SELECT @@VERSION;"

I've got following result for that script:

It looks like SQL Server alive and doing well. It returned it's version and version of the operating system.

After successful verification we have to restart our Windows Server again. Run following script to make it happen:


cls
shutdown /r /t 0
exit
ping 192.168.1.101 -t

After successful pinging reappears you can close PowerShell window. We won't need it anymore.

Step #5. Usage.

That step is the simplest one.
At first just start SQL Server Management Studio on your PC.
Then select "SQL Server Authentication" mode.
Use login "SA" with password "MyStrongSAPassword2016", which I used in the script during the SQL Server installation:

If network is still OK, you should see something like this in your SSMS:

That's it. If anybody have questions to cover please let me know.


Monday, May 2, 2016

How to Install and prepare Windows Core for SQL Server installation.

Previous topics:
Seven obstacles of SQL Server Core Installation
SQL Server Windows Core installation does not support Reporting Service

Read next: Five Steps of Remote SQL Server installation using PowerShell

In previous topics I've described what kind of problems you can face during SQL Server core installations and I think to make the picture fully clear I have to cover the preparation steps of installing and configuring Windows Core for SQL Server installation.

As usually I do everything step by step:

Step #1. Setting up Virtual machine in Hyper-V

You can do your exercise in VMWare as well. In My case I have native Hyper-V App on my Windows 8 Pro laptop.
After you install your Hyper-V application and run it you create new virtual machine:
In the "Actions" panel click "New" and choose "Virtual Machine"
On the next screen click "Next"

On that screen Name your new Virtual Machine. In my case it is "SQL Core".
Then mark a checkbox "Store the virtual machine in different location" and specify the  location where you want to keep your new VM. You might skip that step, but I prefer to keep everything under mine control and in case I need to do a cleanup I know which folder to delete to get some extra space.
After making the change click "Next"

 On that screen change radio button to "Generation 2" and click "Next."


By default Hyper-V suggests me to use 512Mb memory, but I change it to 4Gb. Click "Next" after the change.

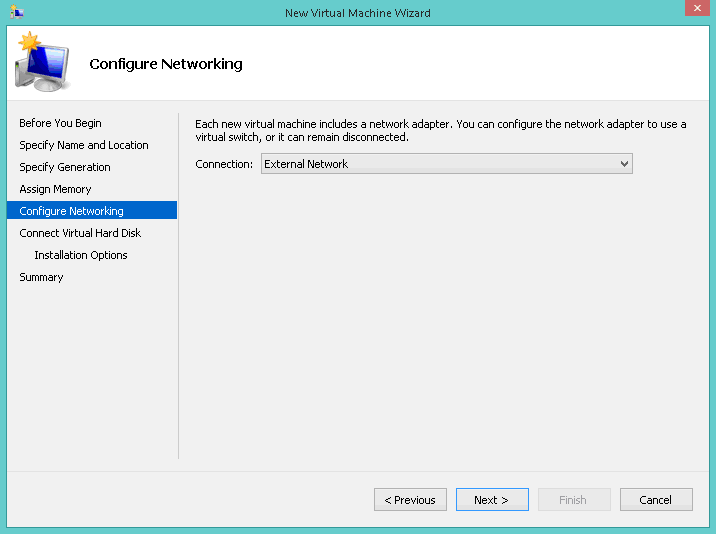
Select network you use. That is the trickiest part. I will not explain how to set the network. Just Google it: https://www.google.com/webhp?sourceid=chrome-instant&ion=1&espv=2&ie=UTF-8#q=how+to+configure+external+network+in+Hyper-V
You need the network for your new windows installation to access Internet to download necessary updates.
After specifying the network click "Next".

Time to specify Hard Drive. I've used default parameters, but only changed the drive size to 10Gb.
It will be completely enough for our exercise. Click "Next" after the change.


You are supposed to have pre-downloaded Windows Server Installation ISO image.
You can download Evaluation Windows Server from here: https://www.microsoft.com/en-us/evalcenter/evaluate-windows-server-technical-preview
For this example I've chosen Windows Server 2016 Technical Preview 5.
Note: Do not try to use 64-bit installation on 32-bit workstation. It won't work.
After you specify the file click "Next".


The last screen where you have to review your settings and start new Virtual Machine creation by clicking "Finish" button.
In very few moments your virtual machine will be created.

The very first thing you have to do after that is to create a checkpoint:
Do Right Click on your new VM and choose "Checkpoint"


As a result it will create a new record in "Checkpoint" panel:
I renamed that record to "VM Original setup" :
You might need that checkpoint of your VM in case you decide to reinstall Windows. In that case you wouldn't have to recreate the machine. That is just a saving point for the first step.

Step #2. Windows Core Installation.

At first, do right click on your virtual machine click "Start" and then click "Connect"
In case you set your VM correctly you'll get the following screen:
You have to hit any button within 5 seconds, otherwise VM will try to run not from your image, but from the network. In case you were late, just shot it down and restart.


If your windows image is accepted you have to get following screen:
 Here just click "Next"

Click "Install now"

Click blue sign "I do not have a product key", that will activate 180 days evaluation.

On that screen choose the very first item. It does not say "Core", which is pretty confusing. However, having words "Desktop Experience" for another installation leads me to an idea that "Core" is a new default standard of Windows. 

Read the document, mark checkbox and hit "Next".

 Obviously, on that screen you choose the second option.

We do not have to do anything with our 10Gb drive. Just hit "Next"

Installation has started

After a while you get following screen:
To satisfy the requirement, you have to virtually press "Ctrl-Alt-Del" using Hyper-V or VMWare interface or just press "Ctrl-Alt-End" on your keyboard.
 
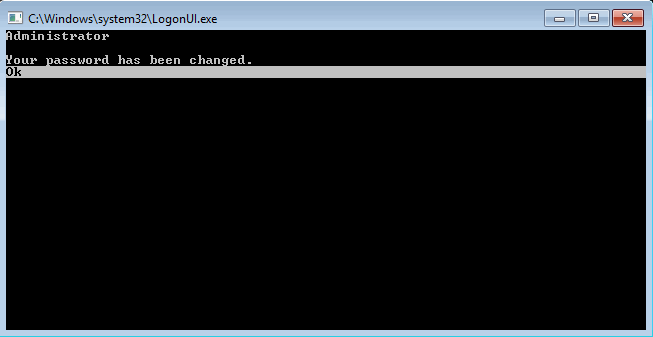
 Say OK and hit Enter.

 Enter new password. For that demo I'm using password: "LocalAdmin2016"

 Say OK.

And you are done with Windows Core Install!!!

The last thing you have to do: create another checkpoint for your VM
And then Rename it to "After Windows Installation"
Actually, by doing that I was little bit surprised. There is ABSOLUTELY NO Interface! NONE! Zero!

Step #3. Establishing Network connection.

If you setup your network adapter and virtual switch correctly that step has to be short and easy for you.

Just run following command to create network resource:
>NET USE L: \\<DServer Name>\<Shared Resource Name> /USER:<User name> /persistent:yes

Than provide password and verify the mapped drive by following command:
>NET USE

You should have result about like that:
There are two reasons why do we do that:
1. It is our checkup of the network.
2. We might need to transfer some files, scripts, logs inside and out of that VM box.


At the end, create another checkpoint called "Network Set"


Step #4. Set your new server for remote management.

Here you have two options:
First (conventional): Run Windows configuration CMD file:
> SCONFIG.CMD
See a description how to set Windows Core Server in 12 steps: http://pc-addicts.com/12-steps-to-remotely-manage-hyper-v-server-2012-core

Second (guru way): Use PowerShell.
Because the first way is already discovered, we go the second way.

1. In your shared folder Create a file "WinCoreConfig.PS1", copy-pase following PowerShell script into that file and save it. In my case path to this file is: "L:\Temp\WinCore\Scripts\Config_Batch.PS1"
#-------------------------------------------
#
# That is the simpliest PowerShell/NTShell script to Configure Windows Core Server for SQL Server Installation
#
#-------------------------------------------

# Setup TimeZone
control timedate.cpl

#-------------------------------------------
#3) Add Local Administrator
net user /add CoreAdmin LocalAdmin2016
net localgroup administrators CoreAdmin /add
#-------------------------------------------
# 4) Configure Remote Management
Enable-NetFirewallRule -DisplayGroup “Windows Remote Management”
#-------------------------------------------
#4A) Allow Pinging
Import-Module NetSecurity
New-NetFirewallRule -Name Allow_Ping -DisplayName “Allow Ping”  -Description “Packet Internet Groper ICMPv4” -Protocol ICMPv4 -IcmpType 8 -Enabled True -Profile Any -Action Allow
#-------------------------------------------
#7) Remote Desktop:
# http://networkerslog.blogspot.com/2013/09/how-to-enable-remote-desktop-remotely.html
#A) Enable Remote Desktop
set-ItemProperty -Path "HKLM:\System\CurrentControlSet\Control\Terminal Server" -name "fDenyTSConnections" -Value 0
#B) Allow incoming RDP on firewall
Enable-NetFirewallRule -DisplayGroup "Remote Desktop"
#C)
set-ItemProperty -Path "HKLM:\System\CurrentControlSet\Control\Terminal Server\WinStations\RDP-Tcp" -name "UserAuthentication" -Value 1

#-------------------------------------------
#8) Network Settings
#N/A
#-------------------------------------------
#2) Computer Name:
Rename-Computer -NewName WinCore
#-------------------------------------------
# Open default SQL Server port
New-NetFirewallRule -DisplayName "Open Inbound Port 1433" -Direction Inbound –LocalPort 1433 -Protocol TCP -Action Allow
#-------------------------------------------
ECHO "Ready for Server Restart"
Pause
#13) Restart Server
shutdown /r /t 0

2. Start PowerShell. In CMD window on your newly installed VMrun following command:
>start PowerShell.exe

You are supposed to get PowerShell blue screen:


3. Run the script from Network Shared folder. In my case command will be like this:
PS C:\> L:\Temp\WinCore\Scripts\Config_Batch.PS1

After command starts you might be disconnected.
Reconnect again and you are supposed to see following screen:
 Change your time zone. Verify that script result has no errors and Hit "Enter" to restart the VM.

During the restart Windows will apply some changes and updates.
After machine will be up and running connect to it again and run "IPCONFIG" command:
>IPCONFIG
 From the result of that command grab Machine's IP address, which you will use from this point.
In my case it is: "192.168.1.101"


Now you can disconnect from the Virtual Machine and create another Checkpoint named "After Configuration".

Step #5. Establish Remote Desktop connection.

1. Start Remote Desktop on your local computer and connect to "192.168.1.101".

2, Use Username "CoreAdmin" and Password "LocalAdmin2016" (See earlier created file Config_Batch.PS1 for details)

If you did everything right you have to get connected:

Step #6. Establish PowerShell connection.

1. On your local computer start PowerShell session.
2. run following set of command in PowerShell (Credits to http://www.howtogeek.com/117192/how-to-run-powershell-commands-on-remote-computers/) ON ONE BY ONE BASIS:


> Enable-PSRemoting -SkipNetworkProfileCheck -Force
> Set-Item wsman:\localhost\client\trustedhosts *
> Restart-Service WinRM
> Test-WsMan 192.168.1.101

3. If test run successfully, you can try to connect to your VM via PowerShell:
> Enter-PSSession -ComputerName 192.168.1.101 -Credential CoreAdmin

After running that command you will be asked for a password:
Use "LocalAdmin2016" again and you will be connected in a moment:


The very last line indicates that you are successfully connected to your new VM Windows Core Server via PowerShell.

Step #7.Install SQL Server Engine.

At first, go to your VM settings and redirect its DVD Drive to SQL Server installation image file:

Now you can create the lat Checkpoint called "Ready for SQL Server"

Tuesday, April 26, 2016

SQL Server Windows Core installation does not support Reporting Service

Previous topic: Seven obstacles of SQL Server Core Installation

Read next:
- How to Install and prepare Windows Core for SQL Server installation
- Five Steps of Remote SQL Server installation using PowerShell


Yep.
You could guess that it is pretty obvious that under Windows Core you can't have SQL Server Management Studio or Profiler, but we wouldn't imagine that one of four main SQL Server components won't be available in Core.

I've tried to install SSRS on my Virtual Core machine and here is what I've got:

Will copy-paste the error message here:
The following error occurred:
You have selected a feature that is not supported on Windows Server Core.
The supported features on Windows Server Core are:
Database Engine Services,
SQL Server Replication,
Full-Text and Semantic Extractions for Search,
Analysis Services,
Client Tools Connectivity,
Integration Services,
and SQL Client Connectivity SDK
.


That Error message let you figure out what you CAN'T install on Windows Core.
To make that decision you have to look through the whole list of possible options in MSDN: https://msdn.microsoft.com/en-us/library/ms144259.aspx#Feature


Obviously, SSRS is a component, but it is not in the "safe core" list.
Lets look at everything else with little cheating: By my experience I can do an installation of whole "SQL" feature module, that means, PolyBase ss part of "SQL" parent feature also has to be installable.
Hold on, lets look at my prior post: Installing Polybase for SQL Server 2016
Basically, for installing "PolyBase" feature you have to install Java from Oracle.
So, I've tried to install PolyBase and I've got that error:

That was predictable.
Then I've tried to install Java driver and got following:
In other words: my device is not in the list of those 3 billions devices, which run Java.
That means, technically, installation of PolyBase is allowed, but not possible on Windows Core Server.

So, where is PolyBase when you install "SQL" feature? - It is just ignored.
I've checked it by running following command:
SELECT SERVERPROPERTY ('IsPolybaseInstalled') AS IsPolybaseInstalled;
That command will return "0" (Zero), which means, feature is not enabled.

In order to determine what is supported and what is not supported by Core installation I had to run each feature separately and here is the result table. Enjoy.


Parent feature parameterFeature parameterDescriptionWindows Core Support
SQL
Installs the SQL Server Database Engine, Replication, Fulltext, and Data Quality Server.YES
SQLSQLEngineInstalls just the SQL Server Database Engine.YES
SQLReplicationInstalls the Replication component along with SQL Server Database Engine.YES
SQLFullTextInstalls the FullText component along with SQL Server Database Engine.YES
SQLDQCopies the files required for completing the Data Quality Server installation. After completing SQL Server installation, you must run the DQSInstaller.exe file to complete the Data Quality Server installation. For more information, see Run DQSInstaller.exe to Complete Data Quality Server Installation. This also installs SQL Server Database Engine.YES
SQLPolyBaseInstalls PolyBase components.NO
AS
Installs all Analysis Services components.YES
RS
Installs all Reporting Services components.NO
DQC
Installs Data Quality Client.NO
IS
Installs all Integration Services components.YES
MDS
Installs Master Data Services.NO
Tools
Installs client tools and SQL Server Books Online components.NO
ToolsBCInstalls backward compatibility components.NO
ToolsBOLInstalls SQL Server Books Online components to view and manage help content.NO
ToolsConnInstalls connectivity components.YES
ToolsSSMSInstalls SQL Server Management Tools – Basic. This includes the following: - SQL Server Management Studio support for the SQL Server Database Engine, SQL Server Express, sqlcmd utility, and the SQL Server PowerShell providerNO
ToolsADV_SSMSInstalls SQL Server Management Tools – Complete. This includes the following components in addition to the components in the Basic version: - SQL Server Management Studio support for Reporting Services, Analysis Services, and Integration Services - SQL Server Profiler - Database Engine Tuning AdvisorNO
ToolsDREPLAY_CTLRInstalls Distributed Replay controllerYES
ToolsDREPLAY_CLTInstalls Distributed Replay clientYES
ToolsSNAC_SDKInstalls SDK for Microsoft SQL Server Native ClientYES
ToolsSDKInstalls the software development kit.NO
ToolsLocalDBInstalls LocalDB, an execution mode of SQL Server Express targeted to program developers. LocalDB is an option when installing any SKU of SQL Server 2016 ExpressYES

Monday, April 25, 2016

Seven obstacles of SQL Server Core Installation

Following topics:
- How to Install and prepare Windows Core for SQL Server installation

- SQL Server Windows Core installation does not support Reporting Service

- Five Steps of Remote SQL Server installation using PowerShell


I strongly believe when a system has less moving parts it behaves more stable and responds faster.
The Windows Core is perfect example when there are much less moving parts than in Windows with GUI.
Why is that?
Generally Windows Server installed with EVERYTHING, with all possible features you might not need, especially when you plan to have only SQL Server in that box.

There are three reasons why Windows Server with Core is better than Server with a GUI:
1. Security: Core has less features. That means less surface for intruders to attack.
2. Management: No unnecessary updates and planned reboots.
3. Resource consumption: Less memory usage and less CPU overhead


I've seen a situation when 8 DBAs connected to a SQL Server via Remote Desktop. Run SQL Server Management Studio with several tabs and query results opened and disconnected from the server without closing their sessions.
Discussion about the lack of memory on that server was very informative and interesting.

You do not have that problem with Core because ALL SQL Server administration can be done remotely from DBA's PC or dedicated Gateway Server. Less people can go to your server more secure and stable it is.

In this post I will describe my experience with installing SQL Server in Windows Core environment.

Here are all Seven obstacles I've hit during that installation:

1. Installation must be performed ONLY in command line mode. There is just NO GUI. You Have to start SQL Server installation with following command:
setup.exe /ACTION=Install

2. Because there is no GUI, installation MUST be absolutely "QUIET", which requires following parameter:
/Q

3.During the installation you are usually asked about License Agreement. Right? To suppress that and "quietly" answer "I Accept SQL Server License Terms", you have to add following parameter:
/IAcceptSQLServerLicenseTerms

4. SQL Server on Core does not support ALL SQL Server features. For Instance it does not support Reporting Services and Management Studio. To solve the issue you have to specify features you want to install like this:
/FEATURES=SQL,AS,IS
More details about features are in MDSN: https://msdn.microsoft.com/en-us/library/ms144259.aspx#Feature

5. You have to decide how you will access your SQL Server. If your Server is in a domain, than you can provide domain admin account or domain group. If you do not have a domain you better use SQL authentication. You also have to specify Local user accounts with passwords, which will be used for running services:
/SECURITYMODE=SQL /SAPWD=<Your strong SA Password> /SQLSVCACCOUNT="MyDomain\MyAccount" /SQLSVCPASSWORD=<Password> /SQLSYSADMINACCOUNTS="MyDomain\MyAccount" /AGTSVCACCOUNT="MyDomain\MyAccount" /AGTSVCPASSWORD=<Password> /ASSYSADMINACCOUNTS="MyDomain\MyAccount"

6. You have to specify name of your SQL Server instance:
/INSTANCENAME=MSSQLSERVER

7. You have to specify the SQL Server product key. If you do not do that, SQL Server will be installed in Evaluation mode. You do it like this:
/PID=<Valid SQL Server product key>

That is it. Seems very easy.

Lets Start do SQL Server Core installation in three easy steps:

Step 1. Connect to a Windows Core Desktop and login as an administrator:


After you login, screen should look like this:

Step 2. Copy-paste following script and hit enter:

d:\setup.exe /ACTION=Install /Q /IAcceptSQLServerLicenseTerms /INSTANCENAME=MSSQLSERVER /SAPWD=MyStrongSAPassword2016 /SECURITYMODE=SQL /FEATURES=SQLENGINE /SQLSVCACCOUNT="WinCore\CoreAdmin" /SQLSVCPASSWORD="LocalAdmin2016" /SQLSYSADMINACCOUNTS="WinCore\CoreAdmin" /AGTSVCACCOUNT="WinCore\CoreAdmin" /AGTSVCPASSWORD="LocalAdmin2016" /ASSYSADMINACCOUNTS="WinCore\CoreAdmin"
There are few assumptions:
A. I've used Server name "WinCore"
B. I've used Server Admin Account "CoreAdmin" with password "LocalAdmin2016"
C. My SQL Server installation DVD is on "D:\" Drive.
D. I've tried "Evaluation" installation mode.

It should look like this:

After several minutes of the installation I got following:
In case your SQL Server installation produced errors, the error file and details will be stored in following folder: "C:\Program Files\Microsoft SQL Server\<Version Number>\Setup Bootstrap\Log\" on the Server.

Step 3. Open Incoming Access Port for Your newly installed SQL Server and Restart the box.

At first, run following command in PowerShell to open the port
New-NetFirewallRule -DisplayName "Open Inbound Port 1433" -Direction Inbound –LocalPort 1433 -Protocol TCP -Action Allow
Then, restart the box.

After the restart, I opened SSMS on my local machine and connected to the newly built SQL Server:

In this post I did not cover the Windows Core installation itself, but I might do it in one of my following posts.